Published December 11, 2022
by Doug Klugh
Ensuring Customer Value
Build automated tests that verify that the acceptance criteria of a user story have been met and demonstrate that the system delivers the value expected by the customer. These tests are best implemented using the domain language without reference to the application’s user interface (UI). This will greatly simplify the test fixtures, access to test results, and obscure GUI components. This, of course, requires a well-factored architecture that decouples all business rules and application logic from the UI.
Acceptance testing will increase confidence that the software is fulfilling its purpose, while guarding against large-scale changes to the system. These tests should be written in a manner that provides high-quality feedback quickly to keep defects from progressing downstream. They should be used as a quality gate in the deployment pipeline and included as part of an automated regression test plan.
When we say that a user story is done, what exactly does that mean? Does it mean it has been released? Deployed? Regression tested? Acceptance tested? Unit tested? Code complete? Code reviewed?
That is exactly what the Definition of Done tells us. It aligns the team on what exactly it means when we say a user story is “Done”. And this definition applies equally to all user stories. So, it only needs to be published once in a shared location. And if it ever changes, it changes for all user stories.
Acceptance criteria is very different. It defines conditions for a specific user story to ensure that the functionality meets customer expectations. Each set of acceptance criteria captures the expected behavior for a specific feature (or slice of a feature). Obviously, that will be different for each feature and must be captured on each user story.
A common format for expressing acceptance criteria takes the following form:
Given an initial context
When something happens
Then this is the result
Well-structured tests begin with test fixtures that establish the initial state of the application, which here is expressed in the Given clause. The When clause then describes an interaction between the user and the application. The Then clause describes the expected outcome after this interaction has completed.
This format originates from Behavior-Driven Development (BDD) and aligns with the standard test structure that follows the Setup, Exercise, Verify pattern. It also aligns with the Build, Operate, Check pattern, as well as the Arrange, Act, Assert patten commonly used for unit tests. Regardless of which pattern you follow; the methods are the same.
To simplify this pattern, just remember that Given describes the initial state, When describes an action or event, and Then describes the outcome.
Building acceptance tests will always begin with writing the acceptance criteria — the test specification. Using the Given, When, Then pattern will help to incorporate the domain language and ensure that everyone, including your customers, easily understand the tests.
After the acceptance criteria is written and agreed upon by the team and your business partners, the developers can begin implementing those test specifications using the domain language. This "Domain Language" is simply an abstraction that incorporates the language of your business — using terminology (business speak) that is prominent within your industry and within your company.
This is accomplished by writing classes named for those logical things (entities) that your company acts upon to conduct business, along with methods named for the actions or events that your business performs to service your customers. These nouns and verbs, which are typically defined within the domain model, should be taken directly from the acceptance criteria to maintain a direct translation from test specification to test implementation.
It is important that the test implementation not contain details of how to interact with the application; that is the responsibility of the application driver. The implementation should also not reference the user interface. Otherwise, the smallest of changes to the UI could end up breaking many different tests, greatly inhibiting Defect Localization.
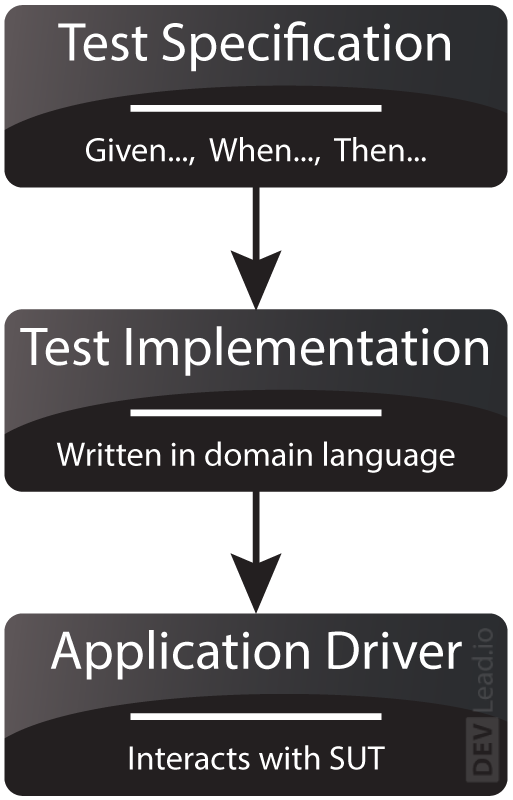
The test implementation should always utilize the application driver to interact with the System Under Test (SUT). This low-level driver knows how to perform actions, trigger events, and return results. If your tests need to leverage test doubles to achieve isolation, this layer is where it would be accomplished.
When building out your deployment pipeline, be sure to create a separate stage for all automated acceptance tests. These tests should be run against every build that passes the commit tests. And if any acceptance test fails, that build should not be deployed.
Acceptance tests can fail for several reasons. A common cause is that the expected behavior of a particular function or use case has changed and either the implementation or the acceptance tests were not updated. Another cause may come from code that was refactored and the test was too tightly coupled to the implementation. Or it may be that the application is simply not doing what is expected.
In these cases, it is critical not to simply ignore the failure and either skip (or worse) delete the test, just to have a successful deployment. The team must put forth time and effort to maintain these tests as requirements, designs, implementation, or the environment changes. Otherwise, you will not realize the value that automated acceptance tests bring to your organization.
Following is a list of 12 techniques that I teach in my training courses on unit testing. While these techniques are invaluable for unit tests, they apply equally as well to acceptance tests:
- Write the Tests First
- Design for Testability
- Use the Front Door First
- Communicate Intent
- Don’t Modify the SUT
- Keep Tests Independent
- Isolate the SUT
- Minimize Test Overlap
- Minimize Untestable Code
- Keep Test Logic Out of Production Code
- Verify One Condition per Test
- Test Concerns Separately
Keep in mind these techniques work best when applied through the base language.
For example, if your application is written primarily in Java, you should write your acceptance tests in Java using a testing framework such as JUnit. Applications written in C# should have their tests written in C# using a framework such as NUnit or XUnit.
Just because these frameworks are called “JUnit” and “NUnit” does not mean they are only for unit testing. In most cases, they are the best choice for not only acceptance testing, but also component, integration, and other functional testing that need to test directly thru the APIs or controllers. This practice will facilitate every one of the above 12 techniques — putting you on the path to delivering stellar acceptance tests.
Conducting acceptance testing using screen recording and playback software... not so much.
Related Posts

assistant Development Tip
Commit Tests
Build a suite of tests that is optimized to run very quickly that serves as the entry gate for the deployment pipeline. In less than ten minutes, the commit stage should either create deployable artifacts or eliminate builds that are unfit for production and notify the team that the application is broken. This suite of tests should include all unit tests, along with a small selection of other types to... Read More